 CHATIQUE #9: Heritage Photos
You may need to file, identify and store photos and documents from the far past. If you are lucky enough to have acquired the originals I urge you to contact an expert. Many counties in the US have wonderful Historical Societies. I actually use the one in the neighboring county because it is more active than one in my own county. Someone there is always ready with new information on products that are available. I use a box that is free of all those known chemicals that can harm papers, photos, tintypes, and old glass photos. They also suggested Glassine envelopes and special separators to hold whatever information I have about each image. There are great archival resources online, as well.
Legacy Multimedia
Antiques at About.Com
Storing your Photos - Scrapboking 101
Storing Photos- Archives.Gov
SORTING and STORING: Although I taught a class on sorting photos for years, I recently found a great site that helped me REALLY get a handle on my file cabinet full of old photos. Organized Photos – www.organizedphotos.com . Within a couple of weeks my 4-drawer file cabinet was ready to go to a neighbor and my photos were in six 4” x 6” by 18” boxes. More recent photos are in several Cropper Hopper Organizers. Negatives are next! This site sells the book on organizing and the supplies to do so but you don’t HAVE to buy anything. I am on my third set of SAFE envelopes.
SCAN OR NOT: You probably want to start with scanning the photographs and documents, once you have them sorted. Instead, you might have some old family photos a relative has temporarily put into your care. The standards have changed since I started scanning my old photos so I find myself re-scanning them every so often. This makes it difficult if you have borrowed the photos. Whether you are storing or borrowing photos and slides, the Internet is a great resource for scanning.
Digital Photos at Geneology About.Com
Scanning by Roger Halsted
You may prefer to take digital photos of the old images. While I scan photos, I have taken digital photos of all of the family heirlooms in my possession. In either case, you want to make sure you have all digital images, scanned or photographed, stored in the safest way possible. I remember back to some pretty outdated methods. I will pass on advice given to me…”At the rate technology advances, do not think any storage method is forever. Re-store every 1-2 years”. My old black floppies went to 3” disks, to ZIP disks, to CDs and DVDs and now two External Hard Drives. You may loose a bit with every transfer. It is best to acquire the technological know-how to store in a “non-lossy” method right from the start.
RESTORING: I use Picasa for cleaning up photos and scans. It is free and probably the best freeware out there, thanks to Google.
http://picasa.google.com/
From time to time there are classes that teach how to use Picasa.
Once I have the colors where I want them on an old photo, I use Photoshop CS2 and PhotoELF to clean it up as far as scratches, tears, folds, spots and dots. That can be tedious, but oh, so worth it! In Photoshop Elements the tool you want is called the Healing Brush. In Photoshop CS it would be the Clone Tool. You probably will want to magnify the area as high as you find comfortable.
Quote from an Organized Photos newsletter:
If you use digital photography, then your digital photos are more than likely already on your computer. Hard drives can crash, technology can become obsolete, and storage devices and disks can fail.
"I have all my digital photos organized into folders on my
computer. We have an external hard drive that I back them up to
monthly, and once a quarter, I make a hard copy on CD and take it
to our safe deposit box (I have recurring tasks set up in Outlook
to remind me.) That way, I have access to all my photos, but there
is another copy at a different location."
Also mentioned was the statement that digital medium is NOT as durable as prints. Some of my photos are over 100 years old. I worry that my digital photos will not last that long. So I follow the advice to have prints made of my best digital photos. I clean them up first: crop, straigten, adjust color and light. Then I send them to one of several online print services I use...Snapfish, Kodak, Shutterfly, etc.
__________________
 CHATIQUE #8: Organizing for Inspiration
ORGANIZE (or re-organize if you are one of those already organized people). Check the state of your folders: Elements, kits, templates, alphas, quick pages, and whatever else you may have been collecting.
There is a great little free utility called Folder Marker http://www.foldermarker.com/ that lets you change the colors of folders. You can even mark them by priority, but I only use the colors right now. The Pro version is $20, but the freebie is just fine.
SUPPLIES: My digital supplies are organized in two ways. On my main computer, I have everything organized by website, first then designer name. Over the years I have found that, because I like to do challenges, etc., I usually look for kits by designer name, first. If all of the kits are labeled the same way they sort of organize themselves. So a kit in my system would be labeled: designer_K_name of kit
Instead of _K_, the other categories are
Alpha, _A_
Background, _B_
Crafts, _C_
Embellishments, _E_
Kits,_K_
Overlays,_O_
Ploppers, _P_
Templates, _T_
WordArt _WA_
On the laptop, I fell back into my classroom organization...by month. By Month goes like this:
001-Jan-new year-winter-snow-tropical
002-Feb-love-valentines
003-Mar-wind-St-Pats-colors
004-Apr-Easter-garden-flowers-bugs
005-May-spring, mother, women, BCA
006-Jun-grads-dads-men
007-Jul-summer-birthday-patriotic
008-Aug-travel-beach
009-Sep-school-harvest
010-Oct-Halloween-outdoor-camping
011-Nov-Thanksgiving
012-Dec-Christmas
013-Wedding
014-Vintage
015-Child
016-Animals-Birds
017-Disney-fantasy-movies
018-Food
019-Color
020-Basics
021-Family
Once you have your folders all set up, and colored so you can find them easily, you may want to list what is in each folder, especially the Kits one. For this I use another little free utility, PrintFolder ( http://www.sofotex.com/downloads/d2071.html ). Both of the utilities I mentioned reside in your fly-out menu when you right-click on a folder.
PHOTOS: For organizing my photos I rely on Picasa ( http://picasa.google.com/ ) It is also free and part of the Google suite so quite reliable. I actually took a class so I would learn how to use all the niceties in that program. I use Photoshop CS2 so there is the "Bridge" attached for showing the scrapping elements. It would also work for organizing photos, but doing elements AND photos in the same program would just confuse me. I prefer to keep them separate.
FONTS: For organizing fonts (I have over 3,000) I use Font Thing, ( http://www.download.com/The-Font-Thi...-10038296.html ) another free program. You can sort and resort your fonts into categories as well as install and uninstall them easily.
Good ways to beat the time when you are uninspired.
 CHATIQUE #7 - Quick Pages and Templates
You can sit for a long time waiting for the muse to land on your shoulder, or you can actively pursue inspiration. Now we are going to find inspiration in some pretty obvious and not-so-obvious places. I challenge you to try each of the suggestions. Once you try them, you shouldn’t have to sit in front of a blank page again for long.
A Quick Page is the quickest way to make a layout.
1. Open the page in your graphics program.
2. Open the photo(s) you want to use.
3. Place the photo(s) UNDER the page.
4. Resize the photo(s) to fit.
5. Save with a different name.
Flip the page and turn it to get 8 different layouts. Sometimes an element will not work turned, for instance, a tag hanging from a ribbon.
Cover an element with a different element.


Change the color before you bring it into your program.
- In PS, set the foreground color to the general hue you want.
- Find the half black-half white circle below the layers palate...Hue-Saturation-check "colorize" and adjust the sliders to get what you want.
- Merge the two layers (Merge Visible) in the layers palate.
- NOW add the photo.


- Import the layered template into your program (Photoshop, for me).
- Put the background you want under the template-piece layer.
- Switch to the Magic Wand and the template-piece layer.
- Click in the white of the template piece and you should see “marching ants” around the piece.
- Switch to the patterned background and delete.
- Then either delete the template piece, or click on the eye to make it invisible.

Once I opened the template I linked all of the layers. Then I hit Control-T (on a PC in Photoshop CS2) to transform. You have to right click for the fly-out menu and I selected "Flip Horizontal".
Then I unlocked the layers and started with the bottom layer. There are as many ways to work with templates as there are scrappers and you will develop your own methods. This is just mine.
I place the element I want, usually a background, UNDER the pattern-piece. If I need to move the element around, as with a photo, I lower the opacity of the pattern-piece so I can see through it. Then on the pattern-piece layer, I use the "magic wand" and click anywhere outside of the piece to select the area I want to eliminate. Then I switch to the element or background layer and delete.
Next I switch back to the "move tool"(V), de-select the marching ants (Cont>D), and put the pattern piece in the trash. If you have shadows on the pattern piece you would keep it UNDER the element. I add my own shadows later.
 CHATIQUE #6 - INSPIRATION - Ads, Covers, Cards, and Artwork
Look around you.
COVERS: The next time you are reading a magazine, pay close attention to the cover. Some covers, like the Martha Stewart magazines, there is graphic artwork that easily translates into a layout. Other magazine covers are just fun to duplicate into fake-covers. Really impresses friends who don't know about digital scrapping. My son-in-law's family are still asking him how his photo got on the cover of a Fishing magazine, and his daughters on the cover of Baby Talk Magazine.


ADVERTISING: It is all around us. In magazines and newspapers we can just cut the inspiration out or tear it out and scan. With TV and billboards it is harder. You may want to start carrying around a notebook or sketch book...purse size.
GREETING CARDS: With all the work and artistic talent that goes into some greeting cards, what a shame that they aren't used. Now that have gone digital I still find inspiration in the beauty of cards. Here is a card I received for Christmas, and here is the layout I did from that card.


ARTWORK: I consider CD covers artwork and here is a CD cover I scanned and the layout from that cover. If you don't feel like visiting a museum to find art, there is a


 Chatique #5-inspiration from others or "Scraplifting"
![]() If you haven’t found your “Favorites” gallery yet, open your own gallery, at any of several digital scrapping sites. If you click on My Favorites you will go to your gallery of pages you have chosen as favorites.
If you haven’t found your “Favorites” gallery yet, open your own gallery, at any of several digital scrapping sites. If you click on My Favorites you will go to your gallery of pages you have chosen as favorites.
In the first section under the details the artist has written you will see “add to favorites” as a choice. Click on that and it will be done!
Take some time to wander the galleries each week and pick a few favorites. Come one of those days when you have no inspiration, you can just go to your Favorites Gallery and be inspired.
SCRAPLIFTING
In Paper scrapping this was called CASE: Copy and Steal Everything. That never did sound good to me. I so much prefer the digi-scrapper term of “Scraplifting”.
You can open the page from your Favorites Gallery in your graphics program, make it smaller and tuck it up in a corner while you work on a new page. If you want to copy it exactly, you can make it the top layer on your blank page, lower the opacity, and build your page under it. However, if you just want to make it your own, having it handy to look at from time to time works better.
GIVING CREDIT
Read the credits very carefully on the page you are scrap-lifting. You may find it was originally scrap-lifted from someone else. This happened in a competition and I heard the original artist was not happy to have her original design not credited.
Include the original artist’s name and a link to her original layout. You can just copy and paste the URL into the credits section of your description or you can INBED it.
 CHATIQUE #4 - Quilt Squares
In Chatique #4 we are looking for ways to use up those "Can't Delete" photos. This time we will look at using a group of shots and still have good design. My 2 granddaughters and their parents visited us in
http://www.freequiltpatterns.info/ has a lot free to gather. I took Four-Block and Drunkard’s Path. I used them for a couple of sample layouts for you.
 t
t
 Chatique #3, Bits and Pieces
Maybe everyone in the picture looks goofy except one person. Maybe the birthday cake looks good but the person blowing out the candles looks really bad. We are going to explore using those bits and pieces.


After I read through a magazine for content, and before I throw it out, I go back through looking for interesting designs in the ads. Many of these work perfectly for bits and pieces.
 Chatique #2, Blending Tchniques
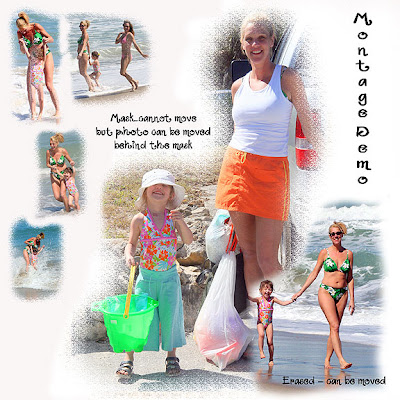
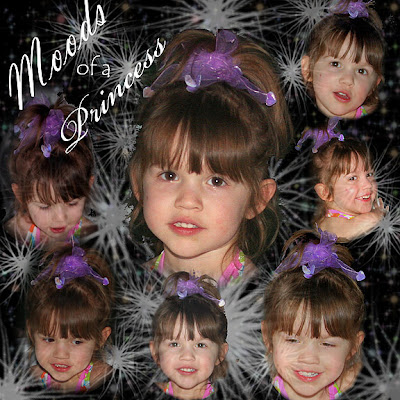
Other blending methods include:
PhotoShop’s MAGIC WAND
ERASING
MASKS and quick-mask
PAINTING WITH BRUSHES
Today’s technique is MONTAGE-using blending to create a montage.
I used to prefer erasing as an extraction technique. A very helpful technique to use when erasing is to put a red stroke around the layer when you think you are finished to catch any stray pixels. Then take the stroke away.
Paths are also a good way to extract. They require a lot of practice.
Masks stay above the photos, you can move the photos around under the mask. When doing a mask, black erases and white restores. This is quite handy.
If you put paint on a lower layer, you may want to lower the opacity of some of the erased photos.
You can change what the magic wand selects by changing the tolerance.
A WACOM tablet is also a good tool to use for erasing.
 Chatique #1, Photo Stacks
With digital cameras don't you take a LOT more photos than you did with film? I have a month-old Canon Digital Rebel and have taken over 1500 photos already. All pictures that weren't "just right" have been deleted, and I kept only the best one of each bird I photograph. However, when it comes to my granddaughters, I just can't eliminate a lot that look about the same. The continuous shooting feature of portrait and sports modes capture all those quick-as-a-wink expressions and I end up with 150 pictures, like I did from a one-hour shoot at the beach with my granddaughter this month.
One technique is to stack photos as I did in these two layouts:
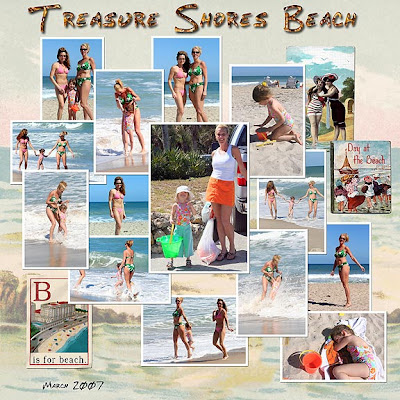
And this one:
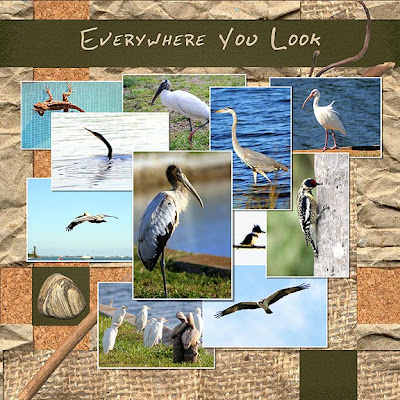
You can use the “drop shadow” style in Photoshop and change the size to show that the top stacked photos have a deeper shadow. I used 3 pixels for those on the bottom and added 2 pixels for each layer above that.
You can make your own shadows by duplicating the photo. Turn the layer below black (or some other color…shadows do not always have to be black). Lower the opacity (I use 40%) and add a Gaussian Blur filter. You can also warp the shadow slightly.
About Me
Blog Archive
-
▼
2008
(21)
-
▼
June
(9)
- CHATIQUE #9: Heritage Photos
- CHATIQUE #8: Organizing for Inspiration
- CHATIQUE #7 - Quick Pages and Templates
- CHATIQUE #6 - INSPIRATION - Ads, Covers, Cards, an...
- Chatique #5-inspiration from others or "Scraplifting"
- CHATIQUE #4 - Quilt Squares
- Chatique #3, Bits and Pieces
- Chatique #2, Blending Tchniques
- Chatique #1, Photo Stacks
-
▼
June
(9)
My Blog List
-
7 months ago
-
5 years ago
-
10 years ago
-
10 years ago
-
12 years ago
-
13 years ago
-
14 years ago
-
-
Forty Years of Scrapping
lauraloub

A granny with a camera and a computer
My Other Blogs
- http://scapethattable.blogspot.com/
- My Snowbird Wildlife Blog
- Musings of a Genealogy Nut
- Gammy's Stories
- A Mother's Legacy


